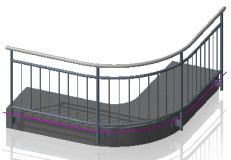
In the first step, the installation situation, i.e. the course of the railing, is defined. For CAD professionals: a 3D polyline is created. Lines and arcs are strung together using buttons. Lengths, angles and heights are then dimensioned as required.
The generated line can represent:
| Course as post line (line between post centers) without reference to floor strips or floor plate. Simplest variant. |
|
| Course as post line (line between post centers). The floor strip serves only for visualization, e.g. for railings in terrain. |
|
| Course as edge of a floor strip. The post line is automatically generated at the desired distance, e.g. for railings along long building edges. |
|
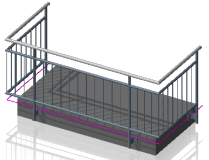
| The course defines the outline of a floor plate. Then the sides for the railing are selected. The post line is automatically generated at the desired distance. Well suited for balconies. |
|